

Complete Usage Guide
This tutorial walks you through building a single-file todo app with Dline. Along the way you will use Plan and Act modes, approve changes, iterate on the result, and roll back with checkpoints.
Prerequisites
Section titled “Prerequisites”Before starting, make sure you have:
- Dline installed in your editor (see Installing Dline);
- an AI model connected (see Models & Providers).
Step 1: Open a project folder
Section titled “Step 1: Open a project folder”Dline creates and edits files inside your workspace. Prepare an empty folder for the todo app:
-
In VS Code, choose File → Open Folder.
-
Create a folder, for example
todo-appon your Desktop. -
Select the folder and choose Open.
The folder now appears in the Explorer. The file list is empty because this is a new project.
Step 2: Open the Dline panel
Section titled “Step 2: Open the Dline panel”Select the Dline icon in the VS Code Activity Bar to open the panel. The panel has three areas: the title bar at the top, the task conversation in the middle, and the input box at the bottom.
Panel title bar
Section titled “Panel title bar”The buttons in the panel title bar work whether or not a task is running:


| # | Button | Purpose |
|---|---|---|
| 1 | New Task (+) | Open a new Dline task in an editor tab beside the current editor; the sidebar and other tabs keep their tasks |
| 2 | MCP Servers | Switch the sidebar to the MCP servers view |
| 3 | History | Switch the sidebar to task history, where you can reopen, search, and delete tasks |
| 4 | Settings | Switch the sidebar to settings, including Profiles, features, and terminal options |
Task header
Section titled “Task header”While a task is open, the task header sits at the top of the conversation. Select the chevron or the task title to expand or collapse it.


| # | Control | Purpose |
|---|---|---|
| 1 | Metrics capsule (In, Out, RPM, TPM, Hit, cost) | Token usage, request rate, prompt-cache hit rate, and cost (when the model has pricing); select it to open API Rate History |
| 2 | Context bar | Context-window usage for the task; hover to see a summary |
| 3 | Compact Task | Summarize the conversation to free context; asks for confirmation first |
| 4 | Copy Text | Copy the task prompt |
| 5 | Refresh Prompt Cache | Rebuild the task’s system prompt; a warning icon means rules, skills, MCP servers, or other prompt inputs changed since the task started. Refreshing causes one prompt-cache miss |
| 6 | Delete Task | Permanently delete the task after confirmation |
| 7 | Close Task (×) | Close the current task and return to the start screen |
When automatic compaction has failed and Retry cannot recover the task, a More context actions (⋯) button appears next to Compact Task. It offers Force truncate conversation history, which asks you to type TRUNCATE to confirm.
Banners may appear under the header, for example when prompt-cache hit rates stay low, when checkpoints fail (Retry Checkpoints / Disable Checkpoints), or when another window holds the task lock (Unlock).
Input area
Section titled “Input area”The Auto-approve bar sits above the input box, and a row of tool buttons sits below it:
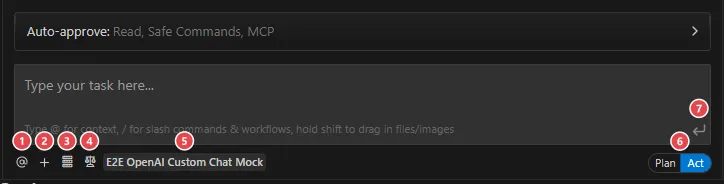
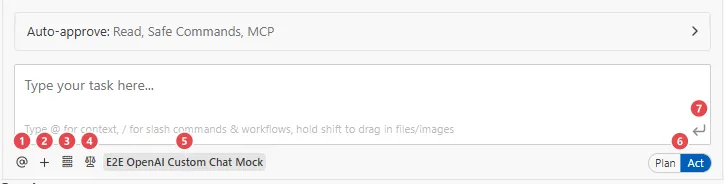
| # | Control | Purpose |
|---|---|---|
| 1 | @ (Add Context) | Insert an @ mention for files, folders, terminal output, Problems, and other context |
| 2 | + (Add Files & Images) | Attach files or images to the message |
| 3 | MCP icon (Manage MCP Servers) | Open the MCP servers popup to enable or disable servers |
| 4 | Scales icon (Manage Dline Rules & Workflows) | Open the capabilities panel for Rules, Workflows, Skills, Subagents, and Environments |
| 5 | Model name (Select model) | Switch the model in use |
| 6 | Plan / Act switch | Switch between Plan mode and Act mode |
| 7 | Send button | Send the message |
Step 3: Give Dline a task
Section titled “Step 3: Give Dline a task”Select the input box at the bottom of the panel and paste this prompt:
Build a todo app in a single HTML file. Include:- Input field to add new tasks- List that displays all tasks- Checkbox to mark tasks complete (with strikethrough styling)- Button to delete individual tasks- Clean, modern design with CSS- All JavaScript inline in the same filePress Enter or select the send button. You can change the send shortcut to Ctrl + Enter or Shift + Enter in Settings → General → Send messages with.
Step 4: Understand Plan mode and Act mode
Section titled “Step 4: Understand Plan mode and Act mode”The bottom-right corner of the input area has a Plan / Act switch. Select it to change modes; hover over it to see the toggle shortcut.
- Plan mode: Dline gathers information and discusses an approach with you. Use it to align on requirements, adjust the approach, and clarify details.
- Act mode: Dline carries out the task directly, creating files and writing code.
Step 5: Approve changes
Section titled “Step 5: Approve changes”When Dline is ready to write a file, the chat shows the target path (for example index.html) and the proposed content, followed by two buttons:
- Approve: let Dline create or edit the file;
- Reject: decline this change; you can then give different instructions.
Select Approve. index.html appears in the Explorer on the left.
Step 6: View the app
Section titled “Step 6: View the app”Open index.html in a web browser:
Option A: Use the terminal
Open a terminal in your editor (Ctrl+` or Terminal → New Terminal) and run:
open index.htmlOption B: Use Finder
Right-click index.html in the Explorer, choose Reveal in Finder, and double-click the file.
Option A: Use the terminal
Open a terminal in your editor (Ctrl+` or Terminal → New Terminal) and run:
start index.htmlOption B: Use File Explorer
Right-click index.html in the Explorer, choose Reveal in File Explorer, and double-click the file.
Option A: Use the terminal
Open a terminal in your editor (Ctrl+` or Terminal → New Terminal) and run:
xdg-open index.htmlOption B: Use your file manager
Right-click index.html in the Explorer, choose Open Containing Folder, and double-click the file.
If you have the Live Server extension installed, you can also right-click index.html and choose Open with Live Server; the page reloads automatically when files change.
Try adding, checking off, and deleting a few tasks. The app runs entirely in your browser with no backend.
Step 7: Iterate on the project
Section titled “Step 7: Iterate on the project”Keep sending messages in the same task. Dline modifies the existing code instead of starting over. Try:
Add local storage so tasks persist when I refresh the pageSwitch to a dark theme with purple accent colorsAdd a filter to show all, active, or completed tasksDline first reads the current index.html, then proposes specific changes and waits for your approval before modifying the file. Select Approve, then refresh the browser to see the result.
Step 8: Undo changes with checkpoints
Section titled “Step 8: Undo changes with checkpoints”After Dline changes the workspace, a Checkpoint marker appears in the chat. Hover over the marker to reveal two buttons:
- Compare: show which files have changed since that checkpoint;
- Restore: open the restore menu.
The restore menu offers these options:
| Option | Effect |
|---|---|
| Restore Files & Task | Revert files to the checkpoint and clear messages after that point |
| Restore Files Only (under More options) | Revert only the files to the checkpoint and keep the conversation |
| Restore Task Only (under More options) | Clear only the messages after that point; files stay unchanged |
To undo a change but keep discussing a different approach with Dline, use Restore Files Only.
Learn more in Checkpoints.
What you learned
Section titled “What you learned”You have completed the core Dline workflow:
- opened a project folder as the workspace;
- opened the Dline panel and described a task in the input box;
- understood and switched between Plan and Act modes;
- approved file changes before they were written;
- iterated by sending follow-up messages in the same task;
- used checkpoints to undo changes.
The same patterns work for any project, from small scripts to full applications. The more specific the context you give, the better the results.
Next steps
Section titled “Next steps”- Task management: the patterns you will use with Dline every day;
- Working with files: reference files, folders, and URLs in prompts with
@; - Rules: customize how Dline behaves in your projects.
Need help?
Section titled “Need help?”- Start a new task: type
/newtaskin the input box and Dline starts a new task with context carried over from the current one; - Report a problem: type
/reportbugand Dline helps you gather the details and file a GitHub issue; - Project issues: visit the Dline issue tracker.